Monday, November 25, 2013

Christmas mini album


Good Monday afternoon.  Hope everyone had a great weekend and got todo some crafting or preperations for your Thanksgiving dinner.  I got to finish my Christmas mini that I had been working on.  I had shown some of my finished pages before on another posting. I'm going to show you the finished album now.
Most of the cuts were from the CAC2 cart. Some of the embellishments were in the actual "CITY SIDEWALKS" paper stack from Recolletions that I had gotten @ M's.
I used two of MS's punches also on some of the pages.

I got my inspiration from Ginger http://mysistersscrapper.com. She has videos' on making this mini album from beginning to end. She also does other mini's that are so AWESOME!! If you get a chance and you have never seen her videos or her blog page check her out.  Shes' AWESOME!!!.
Here is my mini from the beginning.  There is going to be alot of piccs so bear with me or not. LOL.


I'm entering this in the FCCB http://fantabulouscricut.blogspot.com challenge this week. "SPARKLE AND BLING"
Here is the front of my mini Album. I used the MS branch punch to make my wreath. I used some Swaroski crystals on my wreath.  I made some bows from my ribbon stash.  The flowers I had gotten from M's. The paper is from CITY SIDEWALKS  Recolletions paper stack.  I didn't title the mini because of the paper.  It has words on it and I thought that would work.   I made a stick pin from some of my beads also.   Here is a close up of it on my cover. I used a paper doiley that I colored green and adhered it to the front. Then I adhered the brances to that.


                                 On to the inside of the front cover.  And the first page.

 
        The saying was part of the stack so I thought I would use that. The ribbon is from my stash. 


                                     First page of min album with a journaling tag with the stack.
This is the flap opened with a tag and word from the stack. The calender was also in the Stack The poinsettia is from M's.


                  Here is the back cover of the first page. Below is the photo mat opened.

There is a large photo mat stuck in the pocket page on the side.  I didn't take a photo that,  In the top right corner is a Candy Cane cut from the CAC2 cart. and some Baker's twine at the top of one of the Candy Cane's.

                                             Here are the rest of the pages of my Mini.


                                        Candy Canes from CAC2 and Baker's twine.  Pocket for Tag from stack.
                              Photo mat with a ginger bread cookie cut from the CAC2 cart.

           The inside photo mat that can be used either  for a picture of whatever.  The stockings were also cut from the CAC2 cart

The back side of the page. The paper had the presents and I just added the sleigh cut from CAC2

 
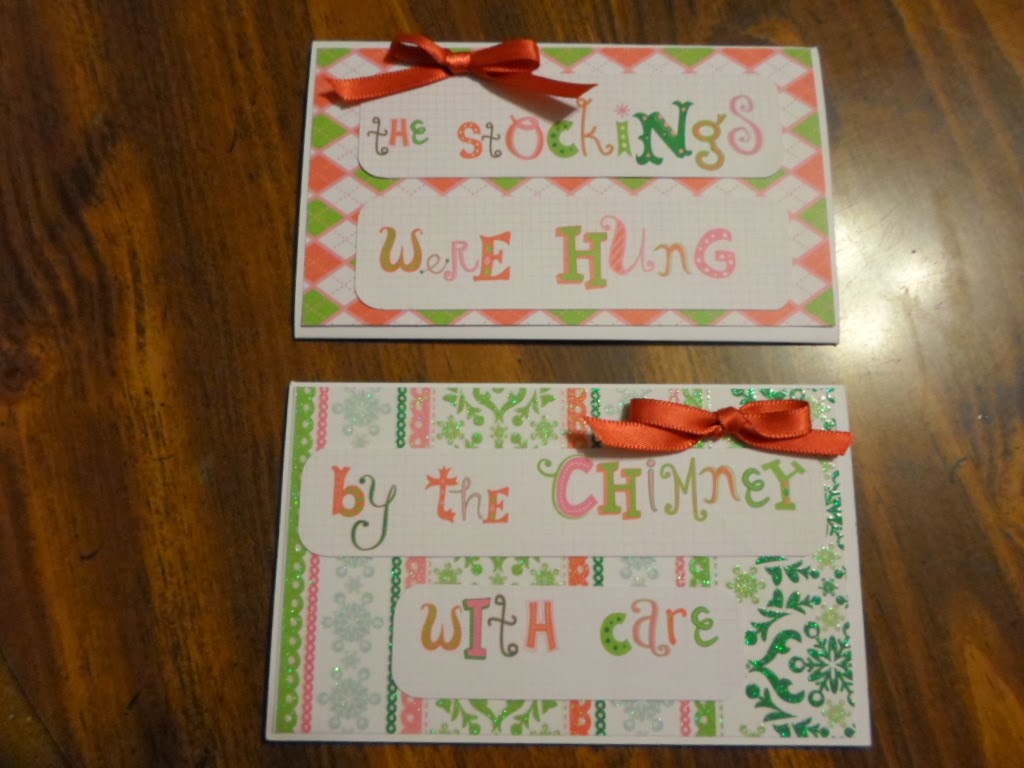
These two pages are 1/2 pages. "The stockings were hung by the chimney with care" is an actual page from the stack.   I just cut them apart  and rounded the corners and added some ribbon from my stash.


The frames are stickers that I had gotten from my daughter.  The ginger bread men are cut from CAC2.  I pop dotted them up to give them some demention.


 Here is the next pocket page in the mini. Tags and saying from the stack. I used Baker's Twine on the top tag.

 In side flap. I took one of the sayings and made a pocket for the larger tag. I made a photo mat that can be use with pictures or journaling on the front and for the inside.
        
Here it is opened.


Here s the back side of the page.  I cut the fireplace from  A Quilted Christmas cart and the layers.  I think I cut the christmas tree from the same cart. I forgot to write this down so I can't remember. LOL (senior moment)
                            I used some silver liquid pearls on the tree to look like garland.


The stockings were cut from the CAC2 cart and I used snow on the tops of the boots. I wished the picture came out better so you could see it.  The initials are for my neice and her hubby and her two girls. I cut a picture frame from the CTMH Artbooking cart so she can add a picture later.  I hung the stockings up with some Baker's twine.

                           I made a cascading mini folder for photos. Here is is closed.
 
                                                                           OPENED UP
 
 
This is the last page in my mini.  The penguin and the mouse are cut from the CAC2 cart. This flap is a two pocket page.  I only added some candy stickers that I had gotten from M's.  The Santa was a cut out from the stack.  I left the big part blank so my neice could put what she wanted here.


                         Here is the back of the last page. This is with the photo window closed. Then you can open it up where you can add one picture and some journaling or what ever you want.
 
Here it is opened


On the back inside cover  I just cut out a border that was on the cutout page and made a pocket to hold tags.


 Thanks for looking at my Christmas mini Album.  I had alot of fun making this with the help of my youngest grandson Colton.  Below is a picture of him sitting in his bouncer on top of the kitchen table where I put this all together. 

 
Hope you enjoyed looking at my mini.  Comments are so welcome.   Have a Happy Thanksgiving everyone.
 

Thursday, November 21, 2013

A Christmas Mini

Good morning fellow crafters. I'm not sure if some of you that read my blog know about the devistating Tornado that hit many parts of Illinois last Sunday.  6 pple were killed thru out the state.
I live in western Ky just a few miles from the Ohio river. The town of Brookport, Ill which is just across the Ohio River from me was one of the towns that was hit very hard. 3 pple were killed in this town alone.  Lots of homes were either destroyed or damaged. They did confirm that it was a F3 tornato that went thru Brookport.  Also the town of Diamond, Il was hit hard also. I have a friend that lives there and she didn't have any damage considering that she lived only 2 blocks from where the damage started.  Also in the conty that I live in Livingston County, Ky there was an F2 tornado that touched down about 10 miles south of me that destroyed 5 homes and 15 homes are severly damanged.
If  yall could take a few minutes and pray for these ppl that lost loved one or have lost  everything that they had.  This is the time of the year to give thanks for what we have and to know that any time we could lose it.    Thanks for letting me write this and for reading it.

On the blog http://www.hidinginmycraftroom.com the challenge this week is "DIE CUTS"  You are to use a die cut on your project. I am doing a Christmas mini album and I'm using cuts from the CAC2 cart along with the Cake Seasonal Sampler cart. I'm going to enter one of the pocket pages from the mini.  This mini album is one that Ginger http://mysistersscrapper.com had done back in the summer.  I knew that I had wanted to do this pocket page mini so I decided to do a Christmas one and with the pocket pages I would do some die cuts.  I thought that this would be perfect for the challenge.

Here are some of the pages already done.  I hope to finish it this week end because Ole Man Winter is going to bring in some very cold air over the next few days.  So I'm hybernating into my craft room.

 This is the front of the pocket page  The papers that I used are from Recollections
 CITY SIDEWALKS that I had gotten a couple of weeks ago at M's. I used a MS lace doily punch on the flap. The die cut is from CAC2. I used some bakers twine on the candy canes. I made a pocket for the tag that was part of the stack.


On the opposite side of the flap I used the ginger bread man from CAC2 . The picture mat is for a 4x4 picture.


On the next part of the pocket page I cut out the stockies from the same cart.


This is the back page with the sled from the CAC2 cart.   I also used some bakers twine. The presents were on the page from the stack. I may still add the reindeer from the CAC2 just not sure yet. But for now this is what I did.
 
Here are some of the other pages that I have done for the mini.


 The journaling card is also from the stack.
 The calender also from the stack as well as the peace cutout.  I made this into a pcoket for the tag that was in the stack also.


 The wording is from a page from the stack.  I just cut it out and adhered it to each small pocket page and added some ribbon from my stash.


I had gotten ome sticky frames from Tuesday Mornings and thought that this would look good on these pages.
 
  Thanks for looking and have a great day.
 
I will post the finished mini when done.

Tuesday, November 12, 2013

"MERRY CHRISTMAS"

BRRRRRRRR  yesterday was 65 here, today its only 37 and windy. Big difference. I know that some of you have snow on the ground and I'm sorry for that.  But I'm glad its you and not me. One good thing is that the sun is shining bright.

There are some challenges this week on FCCB http://fantabulouscricut.blogspot.com and BBTB2 http://heather-bittenbythebug2.blogspot. that got me inspired in finally making a card.  I hadn't been able to make a card since my DH had passed away in April. But with these challenges this week I finally was able to.

The challenge for FCCB is RIBBONS AND BUTTONS.  The challenge for BBTB2 is WHTE-ON-WHITE.  On the FCCB you were to use a ribbon and at least one button on your project.
And of course white on white on BBTB2.  I decided to combine these two challenges with one project.  I will let you know what all I used after I post my pictures.
 
The card base is a 5x7 that I embossed with the HOLLY BERRY BOUGHS Anna Griffin Christmas embossing folders.  I used 2 paper doilies in the middle to give it a little lace look.  You can't really see it in the picture, but they are there.  The next layer is also embossed with the same folder and popped up for demention.  The last layer is my Christmas tree that was embossed using the CALLIGRAPHIC TREE Anna Griffin Christmas ebossing folder.  I used some red and clear gems that I had gotten from M's. and outlined the dots around the tree.   I added the light blue gems for the top of the tree around the star. I put a white ribbon at the top and added a button on the bottom.  Hence the two challenges.  I rounded the corners on the Christmas Tree layer.  I also popped up this layer.  I wanted it to have a three demention look.  Its hard with white-on-white to tell from the picture.


The cricut cut is from DEC 25 cricut cart.  The MERRY CHRISTMAS was cut @ 2.50" cut twice. I cut one in red and one in white and staggered the white over the red. It really does look better in person.
Thanks for looking and please if you are in a mojo slump these challenges this week on FCCB and BBTB2 are simple challenges and there is lots of inspirations from the DT on both blogs. Check them out and maybe something might trigger you in to getting your MOJO back.  I know they did me.  Thanks FCCB and BBTB2.

Have a good week and stay warm and BE SAFE.


Friday, November 8, 2013

August Calender page.

Post #2

Here is my August page after putting the finishing touches on it.  You can see the doilies that I colored yellow and put under the pictures.  I'm really liking this idea of changing the colors.  I hope to try red,but I have a feeling that itwill come out pink. But any way here is my page.
Thank you all for looking and commenting,.


Have a great weekend

July Graphic45 calender page

Good Morning.  Hope everyone had a good nite sleep.  My grandson decided at 4:30 he wanted to get up and stay up. He's 6 months old. So needless to say I've been up since 4:30, he is now back to sleep. Of course now its too late for me to go back to sleep so I will stay awake.

Most of you know that I am doing a Place in Time paper Stack by graphic 45 calender pages. I have been looking at the graphic45 blog site on there calender series that different DT members had done. Also my good friend Suzanne http://cricutcraftinggrammy.blogspot.com teaches at her local scrapbookstore "Scrapbook Blessings".  She had done a calender series for some classes that she taught.  So I 've been looking at both sites and have take different parts of both and made my own. 

On my July page I wanted a blue doily to put under some of the cutouts and chipboard pieces. Of course when you want a different color doily you can't find them. So I googled How to color doileys and I found this site http://charlottesfancy.com/2010 on coloring doilies with food coloring. 

Here is what they look like after doing this teqnique.  I also did some yellow ones but didn't take a picture of them by themselves.  You will see them later on my August page.

I like the pastel look that coloring the white doilies chances them too.
I know that another crafter friend of mine said that you can also color them using ink refills.   I don't have lot of inks since I don't do much stamping, so I found this much easier.
Here is my August 2014 calender page.


I used the blue doily that I had colored under the top right cutout and it made the blues in each picture stand out. I really like the way this turned out. 
Thanks Suzanne and the amazing DT members on graphic45 blog on the inspirations to do this.
Later today I will be posting August page after I put the finishing touches on it.
Have a great day and be careful with whatever you are doing today.

Tuesday, November 5, 2013

Nature or God

Hi my fellow bloggers.  It was a very pretty day here in Western Ky. I got to visit with my great-grandson and granddaughter for awhile today.  She surprised me when I answered my door. She had called about an hour ago to see what I was doing. I told her nothng. We talked for a little bit then she said that she had to go and that she would call me later this week.  It was a very nice visit.

Your probably wondering what I mean by Nature or God. Because of my project that I did this week for the Lasting Memories challenge http://kcclayoutchallenges.blogspot.com  "Mirror Image" I chose to believe that it can be both. But I will let you choose.  I did have a hard time with this challenge because my brain just wasn't comprhending what I needed to do.  I was drawing a blank.
I will let you know what materials I used at the end .
I have also entered this in the FCCB http://fantabulouscricut.blogspot.com crawl this week "ANYTHING GOES"
The background paper is from the Modern Meadow Stack from DCWV.
The font that I used is from Kate's ABC's cut with some of my scraps that i have in my HUGEEEEEEEEEEEEEE scrap tote.  I welded THE OF NATURE in the ccr andI tried to weld WONDERS but forsome reasn it would let me.I put the letters close to to sort of give it that welded look.  I'm sorry that the picture doesn't do the LO justice.  I'm not even sure that I like it. But any way. I will be entering this in the LM challenge.
Here are two close up of the two pictures,  Same Rainbow two different views from each side of the tree.


thanks for looking and have a great week.